
Once all the required elements are set up, you can bring them together by creating a new 'Course'. The course will allow you to define the learning path and specify which badges users need to earn in order to successfully complete it.
You will need:
- a landing page (this should be distributed once you have set up your course).
- at least one document, secured by Reader login/SSO that awards a badge in an assessment module.
- at least one expected visitor list.
How to create a Course
- Select 'Documents', followed by 'Settings' from the main menu.
- Select 'Courses'.

- Select 'Add' to begin creating a new course.

Once selected, you will then see a new screen with a single tab labelled 'Details', where you can begin setting up your course. Here, you can enter a course name and description and apply a security rule. You can also upload an image and banner to make your course on-brand!

Part 1 - Details tab
Name
- Choose a name for the course that clearly conveys its purpose and focus.
A well-crafted course name helps to set expectations about the content that will be covered. it should be concise yet informative, including keywords that reflect the main themes of the course.
Description (not mandatory)
- Provide a description about the contents and objectives of the course.
This description should be clear and engaging, highlighting key topics and skills that will be covered, as well as any important details they should know before.
Security Type
Select the type of security rule that your course will be compatible with:
- SSO
- Reader Login
- Employee login
Course Image (not mandatory)
Upload an image, which will appear as the main visual for your course.
The image should have a 1:1 aspect ratio, and be sized between 100 pixels and 500 pixels. JPEG, GIF, or PNG files are accepted. Download a .psd template here.
Course Banner (not mandatory)
Upload a banner image, which will be displayed as the banner at the top of your course description.
The image must be 1300px wide and 230px tall. Ensure it is high-quality and fits well without important details getting cropped. JPEG, GIF, or PNG files are accepted. Download a .psd template here.

- Select the 'Save & Continue' button to save your changes and activate the next tabs ready for completion.
Scenario
Steve is creating an onboarding course for new starters. Here's how his course looks so far -
Name: "New Starters: Onboarding"
Description: This course is designed to guide you through everything you need to know to get started and set you up for success at PageTiger.
Security Type: Reader Login

Part 2 - Expected Visitors tab
Once the details of your course have been entered and saved, the Expected Visitors tab will become active. From here you can assign at least one Expected Visitor List (EVL) to the course.
This is a critical part of Courses, as it enables you to specify the individuals or groups that are needed to complete the course.
- Select a list from the 'Add expected visitors' drop-down list.
- Select the 'Add' button.
- The 'Expected Visitor list' field will then populate with your selection.
- Selecting the 'Save & Edit' button will display the full list of users.

Scenario
As Steve's course is specifically aimed at onboarding new team members, he has created an Expected Visitor List (EVL) called 'New Starters' that contains the email addresses of all new starters.
Part 3 - Badges tab
When your Expected Visitor Lists have been chosen, you can begin adding Badges. These are what your visitors must be awarded in order to complete the course.
To begin select the 'Badges' tab.
- Select a Badge from the 'Add badge' drop-down list.
- Select the 'Add' button.
- The 'Badge list' field will then populate with your selection.
Repeat the above steps until you have added all the required badges.
Click and drag the badges to rearrange the order, allowing you to define the priority for completion.
- Select the 'Save & Edit' button.
A preview of your selected badges will display, providing an overview of their state. This allows you to quickly identify any issues with the configuration of the documents that award them. This section also displays the expiration settings for each badge.

Scenario
Steve has selected the Badges that are associated with the onboarding documents that all new starters must read and acknowledge.

Top tips & things to look out for
- Make sure the Badge(s) you choose are awarded in a document.
- Make sure the version you wish to use is published.
- Make sure any out of date versions in a document are unpublished.
- Mare sure the correct security rule has been applied to the document.
- Ensure that a Badge is assigned to one assessment in one document only.
By paying attention to these aspects, you can create a well-structured course that maximises learner engagement and effectiveness, ultimately enhancing the overall learning experience.
Part 4 - Notifications tab (Enterprise clients only)
Once your Badges have been selected, you can move onto the Notifications tab.
Turning notifications on will send daily emails to your participants to remind them that they have badges to earn in a course.
The emails will continue to be sent until everyone has earned all the course badges.
- Select the 'Enabled' checkbox to turn notifications on.
- Enter a time that you would like the daily notification to send.
- If required, enter an email address to receive a copy of the reminder emails.
- Select 'Save & Edit' to save your changes and see a preview of the schedule.
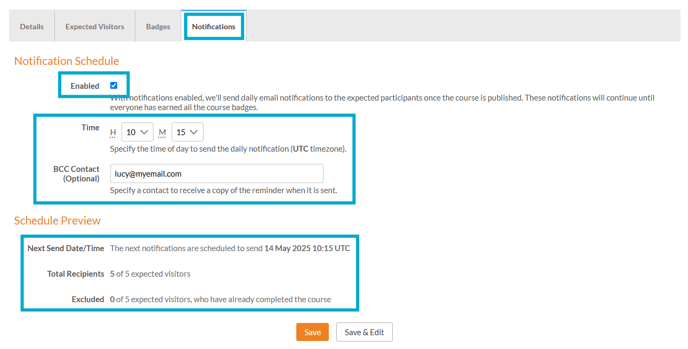
Scenario
Steve has set up notifications to send each day at 10.15am. His colleague, Lucy, will receive a copy of the emails so they can keep track of the reminders.
Part 5 - Status/Publish
Once you are happy with the configuration of your course, you can publish it and distribute the landing page link to your visitors so they can log in and get started!
Before publishing a Course, make sure you have reviewed all aspects of the setup, including Course Details, Expected Visitor Lists, and Badges. If there are any flagged issues, you may wish to resolve them first as they can affect the user experience.
- Select the 'Details' tab.
- Select the 'Publish' button.

- Once selected, you will be asked to confirm your choice.
- Select the 'Publish' button to make the course visible to all users in the Expected Visitors tab. A notification will be sent to each person and you can distribute the landing page link so your visitors can log in and get started!

Explore out the 'History' tab to view the audit for your course - this feature allows you to monitor the development of your course by logging key actions, such as when badges are added or removed, and when the course is published or unpublished.
